Posts

Showing posts with the label beyond the page

August Class - Adore
Image
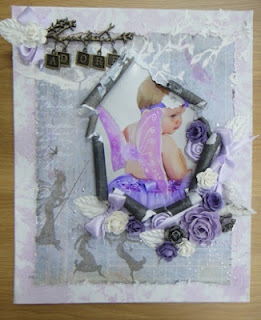
Here's is the canvas class I have designed for August. The class is called "Adore". In this class you'll learn how to embellish with ribbon, how to make your own flowers (of course) and team them with some of the gorgeous prima ones to great effect. You'll also learn how to create a quick and effective background using glimmermist.  I've also added some distressing techniques and a great way to use some of your stencils to achieve a raised 3D effect. Here I used one patterned paper as my frame and clustered my embellishments in the bottom right hand corner of the photo. I really love the prima bird and "adore" branch. If you're coming to this class you'll need scissors and double sided tape and a wet glue (helmar 420 is my favourite for making flowers)an embossing tool and mat and a distressing tool if you have one. Call Arnolds to book in on:   07 3293 4390

BTP- table for the nursery.

Image
This is a really big Beyond the Page project...... Have you ever wondered what to do with those tacky freestanding ash trays from the 60's and 70's? Well...... I needed a small table next to my rocking chair to hold my water bottle and a snack while I'm feeding baby and a place to put the phone so I don't have to get up in the middle of a feed..... But trying to find something that would fit in this tight space was a challenge.... Then I saw this ash tray at a second hand store for $7.50... So I bought it home polished it up.... took off the ashtray part and then added the top (which is actually a cutting board which I've painted and stenciled to match the room. And there you have it for under $20 one side table..... Utilising my scrapbooking stencils and paints also saved me heaps! And if you notice I've used the same stencil on the table top as I have on the drawers in the cupboard I did up.

beyond the page projects for the nursery.

Image
Beyond the Page Projects are alot of fun and let you bring your passion for scrapbooking out of your albums and into your home. I love the "original" feel they give to your decorating. I don't have alot to spend on decorating my home so I enjoy altering old items to save money. Here are the projects I have completed for the nursery. First is this adorable Kaiser "BABY" sign which I did using the same elements I've used on the mini canvases (for the baby's name). I had a few Kaiser Teddy Bears so I kept one aside to make the "sleeping" sign" Then I used the remaining two Kaiser Teddy Bears decorated them the same and attached to the front of the Lowboy I purchased (and spent ages painting!) You can see from these photo's that not only did I paint the outside but also the inside..... that was my cunning plan so I could add these cute teddy bears on each shelf. Using a simple stencil I purchased from Crazy Clarks. Now I know I've show...

Off the Page Projects for around the home - Living Area

Image
Here are some photo's of the off the page projects I recently completed for around my home. These items are all in my living area. For those who have been reading me for a while you'll remember the artworks I completed for this area to match the cushion and the colour scheme is bronze,black, silver, white. This first item is a paper towel holder which I painted silver and then created a bronze topper for it using a piece of chipboard I decorated. Next is this folder "Family Organizer". I got so sick of all the pieces of paper I had to hang onto for each member of the family like the dancing newsletter for my daughter outlining the concert information etc etc etc.... so I created this folder with a section for everyone... Now every piece of paper has a place be that bin or organiser or bills folder. I then altered a letter holder to make it match my colour scheme this was a simple case of painting it with acrylic paint and then adding the chipboard element (gotta love ...

Beyond The Page Project - Lamp

Image
Beyond the page item: A Lamp for the Nursery. I had an idea for the nursery to do a lamp with a teddy bear impaled on a stick with the lamp fitting coming out the top.... after much searching of the second hand stores I couldn't find what I was looking for and then last week I saw this..... this teddy bear lamp was looking a little worse for wear so I enlisted the kids help to paint it. It is made of a clay like substance that isn't glazed so it was easy to paint. Then I had my husband (the artist in our family) paint in the leotard and I added the tutu and roses. I wanted to do a ballerina teddy bear as I had purchased a quilt cover set for the cot which has a ballerina teddy bear on it and the bassinet is embroidered with ballerina teddys too! I have been bargain hunting I can tell you! Thank goodness for EBAY.

Black White and Silver Castle Book

Image
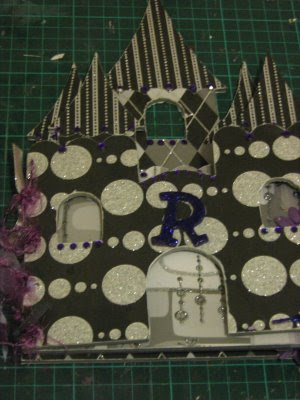
I just fiished this princess castle book from Kaiser Craft for DD. I used DCWV Paper Stack Glitter Papers for the project. I wanted to make this different as most of the examples I've seen on this project are done in a pretty pink and green. So I thought black silver white and purple would be different. I'm going to fill this with photos of DD at different ages and different sayings I'd like her to remember. Next project will be DS's castle. My challenge was to only use items from my stash. This is a great way to use up excess supplies and also makes you stretch your creativity a bit.

Beyond the Page for my Scrap Room

Image
Here at last are the photos I promised you of my scrapbook space makeover. I've started decorating my scrapspace to make it brighter and more cheerful (less boring). I was given these drawers and thought they'd make a great place to store my chipboard letters. Now when I'm doing a tittle I simply get the letters from in front of me rather than digging through a large box. Plus it makes it more interesting for mixing and matching fonts. I've used the Kaiser Scrapbook beyond the page range and have also done a "Tabe Tidy" and "Magazine Holder" and then covered them in Kaiser paper. I chose these papers because they're perfectly co-ordinated and very bright and colourful. I wanted to go with a pink, orange and lime green colour scheme so thought this paper perfect for the job! I'm planning to do the ribbon storer, rubbish bin and 12 x 12 paper storer also. But will have to wait a little while as the paper storer is $50 in it's raw form....l...