Posts

Showing posts with the label Air drying clay

Moving, MOVING, OMG I'm moving...

Well the packing is really tedious..... and I'm rnning out of boxes but I can see that light at the end of the tunnel. The big move is this weekend! Can't wait till we're all settled and unpacked! I can't wait to get my scrapbook area set up again.. it feels like forever since I scrapped! My sister-in-law did tell me though that she picked up some fabulous thickers look alikes at "The Warehouse". (The Warehouse is part of the Crazy Clark's Group I believe). Now I have heard a rumour that the Crazy Clarks group is in receivership.... so keep an eye out for really great bargains! I'm hoping to get in there to check out the thickers look a likes as soon as the school holidays are over and the kids are back at school.... I should be completely unpacked by then and actually able to do some scrapbooking... Can't wait! Well have a happy easter everyone; don't forget to look out for pretty wrapping etc off the easter stuff (use acetate to make it safe...
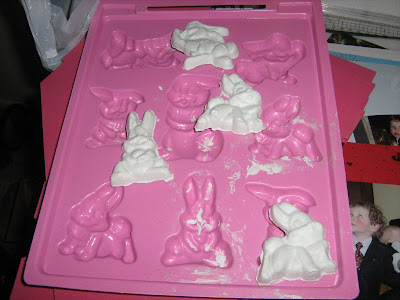
Easter Embellishments from chocolate moulds

Image
If you're wanting to make some embellishments for your Easter Layouts I can highly recommend this method... very cheap! I was shopping in my local thrift shop and saw this chocolate mould. There are actually two sides both of which cost $2.95. I then made up some air drying clay (if you're interested in how to make this check out my previous posts for the video tutorial). I then pushed the clay into the mould after giving it a light spray with cooking oil. I let it dry for 24 hours then it just popped out of the mould. I'm going to paint these in pinks and blues and yellows. I only used one side of the mould as I didn't want a "solid/ rounded" item which would be too hard to stick to my page. By only doing one side of the mould I have a flat backed item that is easy to stick down.

My Off The Page Project - Cubby House

Image
My Latest Off the Page Project is...... A Cubby House! Here is "Rose Cottage". Complete with carport for DS's little jeep... This cubby house took my father-in-law and DH a weekend to build. We were lucky enough to get our materials for free (only spent $80 on the roof, and some wood for the frame, hinges, door handle, letterbox, window box and one of the pailings in the verandah and the lino flooring.) as our neighbours were renovating their house. This shot is from the front showing the planter box and letterbox off to their best advantage. On the door I stencilled some roses in the corners of the door and then I stamped "welcome" on this little oval plate then I stuck down some blue roses. (for regular readers you'll notice they're the same type of rose as the ones I used on my DD's wardrobe) These roses were stencilled on the outside of the cottage. This letterbox was added as my kids love to get the mail out of the letterbox and pretend t...