Posts

Showing posts from 2012

Emergency Card Kit

Image
So this is a gift I like to give at Christmas  as it means 2 people at least saw your card before someone threw it away. I make up a pack of cards out of co-ordinating papers and put "Birthday" "Sympathy" "Thank You" and a "Love" card in so that the recipient can "Break the Plastic in case of Emergency they are unprepared for". So if you get to work and find out that it's your co-workers birthday and you had forgotten.... you break the plastic and whip out a handmade card and write on it.

Miserly Ways - revisted

Hi Guys,  When I started this blog my aim was to get people interested in scrapbooking who perhaps would not have done so because they thought it was too expensive. That hasn't changed but it has been some time since I reviewed my list of ways to save money on scrapbooking so I thoought I'd revisit those ideas for any newcomers to my blog. My frist tip is to go shopping with a friend. Share the costs! I have a scrap buddy and she buys one stamp and I'll buy another which is especially good when they're Buy 2 get the 3rd free.... This allows us to pool our resources and take home lots plus have access to lots too! We borrow each others stuff regularly! That scrap buddy comes in handy for hint 2: buy in bulk. Sometimes you'll get a discount for buying in bulk.... do it! Also pattern papers come in lovely books with usually 2 of each pattern.... but you really only need one of each pattern. So again share it with your buddy. My next tip (no 3) buy tools. If you ha...

Snow Globe Christmas Card

Image
Hi guys I wanted to quickly show you this card my daughter made for her teacher at school who is a fabulous teacher! We started with some packaging off an item we'd bought (that's the miserly point) we covered the back of the cardboard in wrapping paper and then using a beautiful christmas image I bought at Arnolds we layered the images with foam tape to create the 3D image. I then glued this to the background. I then glued the "Happy Christmas" onto the acetate front of the packaging on the underside.  Next I added some white flower soft to the front dome of the packaging and ran a line of dimensional magic around the dome and the edges before adhering this to the background. Apply firm pressure until dry. Then turn over and stick down any edges that require it using sticky tape (clear) and then apply a piece of plain white cardstock to the back to leave them somewhere to write. So save all that packaging you're going to come into contact with this Christma...

Miss You Layout Video's 1 and 2.

Image
Hey guys, Here are two videos I did to show you how I put together this layout. I hope it gives you some ideas and inspiration for your own layouts. Would love to see what you come up with. You can email me at: cheapscrapbookingideas@yahoo.com if you'd like them posted here.  My nana was a huge part of my life. I shared a bedroom with her for 15 years and recently scrapbooked this photo of her and one of her sister's and I guess I kinda thought it very therapeutic. Scrapbooking can be a great way to work though your feelings on something painful.  I think the fussy cutting helped with that alot. So if you have something to work through I highly recommned fussy cutting. LOL

How to Make Rosebud Paper Flowers

Image
Hey guys here's a quick video I put together to show you how to make rosebuds out of paper.

"Honey" Canvas

Image
Hey Guys, here's another free tutorial I've done for you. This project is on a round canvas. Just for something different.  Also just remember when glimmermisting on canvas that it takes a little longer to soak into the canvas than it does to soak into cardstock. So be careful not to add too much glimmermist too quickly as your image may "bleed" round the edges.  There's no sound to this video and the lighting isn't optimal as I only had my son's camera on hand to use but you get the idea. (Captions explain the steps). I hope you find something useful in this video to use in your own projects.

Antique Wardrobe October Class

Image
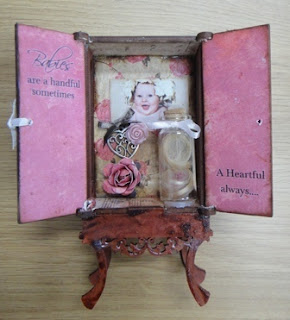
Join me in October at Arnolds Scrapbook Store to make this gorgeous mini Antique Wardrobe. You can either fill the jar with hair or a tooth or even just flowers, the choice is yours. Phone Arnolds 07 3293 4390 Shop T4.02  743 Deception Bay Road, Rothwell

Perfectly Old New Again October Class

Image
Here's another class I'll be teaching at Arnold's this October. You can either bring in an old frame you have or buy one of these frames from "The Warehouse" to decorate. We'll be learning how to make all the flowers (of course) and doing some gold leafing and texture paste and fussy cutting and we'll make the butterfly. This is a great class to turn something old you have into a new decorator item for your home. Look forward to seeing you there.

Family Organiser October Class

Image
Here's a class I'm teaching at Arnolds this October. We're going to take all that clutter you have on your bench and find a new home for it. lol. Above are two examples I have made for friends to show you a couple of different colour schemes. I have one of these and I love it! I have a place for all the notes and permission slips etc etc etc that you seem to be inundated with for each child. You also then have a place to put those things you want to hold onto yourself for a week or two... you know the vouchers or specials pamphlets LOL Anyway at this class you can choose the papers you want to use to match the decore of your home. Above are two examples I have made for friends to show you a couple of different colour schemes.

Love Wedding Canvas - Step by Step

Image
Here's a project I have just finished for a friends' wedding. This canvas will sit on the "guest sign in book table".  I have taken step by step photos so you can easily see what I've done. For this wedding I have used a Black and Gold and White colour scheme throughout to set a formal elegant theme. Step 1. was to spray the background of the canvas with gold glimmermist through a piece of lace. I then added papers and embellishments to the front of the canvas using Bo Bunny papers and a variety of other manufacturers products.  I used the Sizzix Hardware die to cut the gate hinge and then painted it gold.  The black bling bazzil shape is the centre cut out from the wedding invitations and put through the big shot with an embossing folder.  I also used the Sizzix Tim Holz Die to cut the birdcage and bird.  These rosebuds were made using the EK success mini flower punch.  A bit of poetry from "Shelley"  Some ha...

Issue 16 of Australian Scrapbook Ideas Magazine

Image
Issue 16 of Australian Scrapbook Ideas Magazine is out now! This is the front cover. My article is on page 18.

Australian Scrapbook Ideas Magazine Issue 16

Issue 16 of Australian Scrapbook Ideas Magazine will be on shelves any day now. Keep your eyes peeled! I got my copy yesterday and have loved pouring over every article. This time your freebie is a Christmas Craft Ideas Booklet. I love this! Australian Scrapbook Ideas put out their Christmas Ideas issue early enough that you can start working on your Christmas Presents. I especially love Kerrie Gurney's advent Calendar. And on page 18 of the magazine you will find my submission for the Double Page Layouts. I was asked to do 3 double page layouts on our Family Traditions. I couldn't use christmas themed paper but it had to be traditional christmas colour scheme on Kraft Colour Cardstock. Check it out and let me know what you think! So run down to the shops and get your copy now!

Treasure Friends Shadow Box

Image
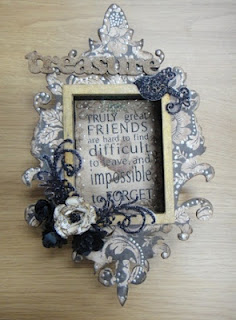
Here's another September class I'll be teaching at Arnolds. For this project I used the free stamps from the issue of "Australian Scrapbook Ideas Magazine" that I was on the cover of.  I will be teaching a few techniques in this class apart from the obligatory flower making.. LOL. Distressing, using distress crackle, stamping, and a great technique with acetate and glitter. Hope to see you there.

Organising your scrapspace

Image
I'm listening to the podcast at paperclipping.com today and loving the tips and hints by Tim Holtz. Love his stuff! This topic is about techniques and how different people are set up in their space to do the messy stuff. So I thought I'd share my ideas. I have a $2 plastic tablecloth from the $2 shop covering one table space for stamping on and I have a large box that I put on my table as a spray booth for when I'm spraying or painting. This box closes up and goes under the table when not in use ..... or sometimes I leave it under the table and work there if my table is full! LOL. I have another table for my cricuit, big shot, heat gun, mini iron, hot glue gun and a mat to work on there.(It's a two tier table, cricuit on the top shelf). There are shelves above it with my cartridges, dies and glimmermists to be stored. My main table that I work at was our TV cabinet. We had one of those really large rear projection TV's and I had a capenter make u...
Image
Here's a layout I did for my hubby to document how he feels for a change. I'm always doing layouts about my mum and my nana who I miss dearly.( Sorry I couldn't crop out my craft mat as the wings go off the edge of the page).  So a change of subject was definitely in order. I do try to do layouts of my mother-in-law whenever possible but I just don't have the sheer number of photos of her. (My dad gave me all the photos in the house of my mum right back to her childhood when she died) So how did I save on this layout? Well the cardboard was free.  I handmade all of the embellishments except the frame which I bought from K-Mart. I made all the flowers out of off-cuts of paper from other projects. I also made the wings in the top left hand corner by stamping on a scrap of acetate and then dusting fine  glitter over the wet ink. The little resin bird is a more expensive element but well worth it. I did save by doing the title and journalling by hand so I guess tha...

Video - making rosebuds from paper

Image
Here's a quick video I did to show you how I make the rosebuds I put on my layouts. These are great because you can make them using the scraps of paper and left overs from other projects. The leaves can be made the same way too so you get a cute bud and leaves from the one punch. Enjoy... Please feel free to share with all your friends.

Free digital download - bookmarks

Image
Here's another freebie for you. This digitally designed element is a bookmark. There are a couple of different designs available in the download. These downloads are compatible with the MyMemories Suite Software.

Adore - Canvas August Class

Image
So this is the sample I have provided for this week's class at Arnolds' Scrapbooking (PH: 07 32934390). This photo was done by my photographer "Net Herbert Photography" and this one is a shot of her daughter that I've done as a canvas as a gift for her. The other photo I thought of using here was a black and white image of my mother as a little girl as I thought a vintage photo would look lovely here. In this class you'll learn distressing techniques, glimmermisting, working with ribbon, making rose buds and the larger rose, and applying texture. The photo you choose for this layout could be colour or black and white. If doing a colour photo and you want to change your accent colour from purple to something else please let the shop know ASAP... Hope you can join me for this fun class, there are still a few spots left.