Posts

Showing posts from 2011

Goodbye 2011

Well it's been a fantastic year and as I know I won't have time to wish you all a Happy New Year I thought I'd get in now. 2011 has been a great year for us. It's had it's ups and it's downs but all in all I came out on top. Which is why I coined the phrase "Everything's coming up Kyra" (if you watch the Simpsons you will remember an episode when everything was coming up Millhouse.. LOL).  I renewed my wedding vows to my wonderful husband of 15 yrs. We are all healthy and happy. My eldest turned 10 and my youngest turned 3. I have enjoyed my new job at Arnold's Scrapbooking so much and want to thank all the lovely ladies who have come to my classes.  I was talking to a nurse at a christmas party recently and she was so jealous to hear that my work day ends with my wonderful students thanking me for teaching them and commenting on how much they love my creations (one expecially lovely student made me a beautiful christmas card too), whilst the l...

December Classes @ Arnolds Scrapbooking Store

Image
Hi everyone, well I'm sure you're all busy making gifts for friends and family getting ready for Christmas. I make these two canvases and will be giving the blue one away to the special lady in the photo with me. She was my mum's best friend. This year my husband and I renewed our wedding vows on the beach for our 15th Wedding Anniversary and she came. Darling Hubby sang the Savage Garden Song "I think I Loved You before I met you" to me as I walked down the isle. Afterwards she made me cry ALOT by giving me as a gift the crystal clock my mum gave her for a wedding present many many years ago. So I made this canvas to gift to her as a thank you gift. I'll be teaching this canvas and the pink one at Arnolds Scrapbooking Store this month, 14th and 17th respectively. So if you'd like to come along and make either (or both LOL) of these as a gift for someone special in your life just give arnolds a ring on : 07 32934390   At both of these classes you...

Little Shops' as cookie boxes

Image
Don't you love these cute little shops. I've been calling them houses but they're really shops.. see the shingle out the front? I am making these for Christmas and filling them with cookies or lollies to give to friends and family. They are really easy to make. To make them I used a template from the Cricuit Cartridge Sweet Tooth Boxes and then it's just a matter of sticking everything down and glueing them together.  I'm demonstrating these at Arnold's Scrapbooking Store at The Zone Rothwell this saturday from 9:30am if you'd like to come watch or pick yourself up a precut kit.

Love Shoes!

Image
Looking for a cheap and really cute gift idea for Christmas? Here are some shoes I made for a girlfriend of mine to give to her coworkers for xmas.  She is going to make fudge and put it in cellophane bags sitting in the shoes. I cut each of these from a single sheet of patterned paper. I used my cricuit and the Princess Party Cartridge to cut these. One of the shoes uses two different papers as it wasn't a double sided paper and I had to hand cut the sides of the shoes to stick over the plain paper. For decorations you can either go all out with your left overs like I did or a cheaper decoration would be to use a strip of co-ordinating paper across the toe of the shoe (check out the shoe in my november classes) which you can punch with an edge punch and then add a large jewel.

November classes I'll be teaching at Arnolds Scrapbooking Store

Image
Here are the classes I'll be teaching at Arnolds Scrapbooking Store. There are lots of other things on offer by the other teachers if none of my creations take your fancy. LOL  go to: http://scrapbooking.arnolds.net.au/  and browse the class list. You won't get photos of all the classes though. But if you join the mailing list they'll email you out photos of each week's classes as they approach. Hope to see you at one of my classes..... and if you come don't forget to tell me you read my blog. Luv to meet some of my readers. This is a really great present idea. It's a folder and birtday book and a selection of cards to go into the folder.  This class is called golden angels. The large brown box is a writing set. The gold purse is a chocolate gift. The round box is a really nice gift idea as it is a box filled with angel wings and a lovely sentiment. The small butterfly box will hold a small piece of jewellry and the card has a gorgeous golden angel charm on it....

Little girls blue and purple bedroom

Image
These are the photos of the girls bedroom. The name plate for the door is first.  Then the lamp. All I did here was spray the base and lampshade to match the bed.  I glued on tiny satin rosebuds. Then I stamped butterflies onto acetate cut around them and then coloured them using art glitter. when it was done I added dimensional magic to stop all the glitter falling off over time.  The bed was white when I got it. We sprayed it in two colours. Purple down the bottom and then blue up the top. The small 3 tier shelf was sprayed the same.  This is the painting my darling hubby did for my daughters room. (last year) and I wanted to keep it in the decorating as he put so much work into it.  This is a canvas that I will be teaching at Arnolds in the future (you are getting a preview).  I did the background using a stencil and glimmermist. I handmade the flowers and made the butterflies using the stamping on acetate technique. All in all this was a very cheap...

Alphabet Stickers

Hi Everyone, I have been very busy re decorating my daughters' bedroom.  I have moved both the girls into the one room so we can have the other room as a playroom. So...... of course we needed to redecorate. I got some bunkbeds on Ebay and have painted them to suit the theme and have used some scrapbooking supplies to make the sign for the door (I'll upload photos soon) but what I wanted to let you know is if you use alphabet stickers or thickers and have some in your stash but they've gotten to the point where you can't use them anymore as there aren't enough letters left on the sheet, instead of buying another packet of the same I buy white stickers of thickers and then use them with the other left overs.  For the sign for the girls door I have used some blue thickers and then I used white ones that I stamped with a lace stamp in purple. (The girls room is blue and puple). But if you don't want to alternate your colours you can colour the entire letter in th...

Measurements for Teachers Gift

I have had a request for the measurements for these projects so here they are.... hope this makes sense for you. Mini Canvas Magnet (it's a 4inch x 4inch canvas) you will need patterned papers as follows: One 10cm x 10cm One 4cm x 10cm One 6cm x 6.5cm One 2cm x 6.5cm One 1.75 x 7cm Diecuts and Stamped Titles File Folder Covers: Two pieces of chipboard covered in brown paper 16cm x 10.75cm Folder pages: Six pieces of yellow cardstock 14.5cm x 10cm Concertina sides to file: One piece of Blue cardstock 16cm x 17cm (fold fan fold back and forth at 1cm intervals) chop this in half to give you two pieces that are 8cm x 17cm. (one for each side) Bottom of Folder: One piece of blue cardstock 13cm x 16.5cm Cover decorations: Once piece of patterned paper 6cm x 10cm. and Once piece of patterned paper 16cm x 7.5 or two smaller pieces as we used (yellow blue and green ruler patterned paper) Two diecuts. Thank You Card : One card and envelope set (available at arnolds) One...

"Mothers Inspired the Soul" Canvas Class at Arnolds Scrapbooking

Image
We ran this class twice as it was so popular so I haven't been able to put the instructions up until we had finished both classes. Today I had a real newbie scrapper who did this class and she did a great job of this, so it's suitable for all levels of scrapper from newbie to advanced. I've used the gorgeous Melissa Francis papers but you could adapt this layout to use any two papers from the same range. This canvas is a 10 x 15cm canvas that has been painted using a sponge roller and a pearlescent pink paint by monte marte. I used papers by Melissa Francis to create this layout. I have distressed the edge of my papers and then inked them but feel free to leave this step out if you don’t like a distressed effect to your page. (A small sponge is included in your kit for this purpose).   Distress and ink the edges of the 19 x 23.5cm patterned paper. Using a scalpel cut the points of the bunting flags to allow your photo to poke slightly under the cut out pieces. Using...

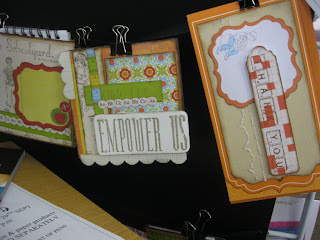
Teachers Empower Us Gift Set

Image
Here is the class I taught today at Arnolds Scrapbooking store.  I had a small class of really lovely ladies to teach today and hopefully I did a good job. Marlene may try to make one of these mini concertina file folders again (fingers crossed I haven't turned her off them for life). I enjoyed teaching this class as all the ladies were warm friendly people which really helps when you're teaching a class. I used to teach people to drive and we held classes on various related topics like maintenance etc, then before that I taught people to sail but this is by far my favourite teaching post! I sanded the edges of all the elements and used a dauber to sponge ink (Tim Holz Distress Ink Walnut) onto the edges of all the elements to give a more aged appearance . It is up to you if you’d also like to ink the edges or if you would like to leave your items uninked.   Thank You Card 1.   Ink all the edges of your elements. 2.   Sew the straight line and the scallope...

Inspirational Quote Canvases Class

Image
This is the class I taught this Saturday at Arnolds' Scrapbooking Store called "Inspirational Quote Canvases" . You'll find photos of each canvas and the instructions on how to re-create the project yourself listed below.   I had a lovely group of ladies for this class which made it really easy to teach! LOL Materials: 4 mini canvases (4inch x 4inch) 1 piece patterned paper half a packet of Kaisercraft Blooms in coconut 1 bunch of orange blooms 12 inches of ric rac 1 gold heart charm (come in pack of 10 for $2) 1 set of angel wings 1 Kaisercraft craftwood picket fence Embroidery Thread or Floss Tools: Scissors Glue (really strong PVA or Pritt are both good) Pencil Tim Holz Distress Ink Walnut Butterfly Stamp or Butterfly Die Cut Instructions: Before you begin working on any canvas in particular you can grunge up your flowers a little more if you’d like, using either a dauber or the sponge piece and a brown ink (I used Tim Holz Distress Ink Walnut Stain). Ne...