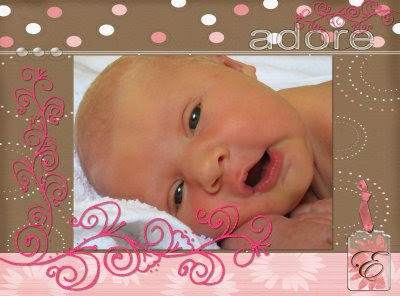
Posts

Showing posts from January, 2009

Baby Layout: Ella

Image
So here is another layout I've done of the baby. ... You'll get really bored of baby layouts before the year is over I'm sure... Anyway the "Ella" was a purchase I made at a little knick knack store. I was thinking of putting it on the nappy bag but when I opened the packet I found out that the name wasn't stuck together it was instead made up of all the individual dots and to transfer this I would have to be very good at lining them up again. (not one of my skills) so I kept it on the clear backing and instead added it to my layout. Here I have used four pieces of patterned paper from the DCWV Nana's Nursery range. The saying is a TLC Phrasez Fayette Designs and a TLC chipboard embellishment. (The TLC stuff was a present so didn't cost me anything.... I love friends who give scrapbook stuff as a gift! Isn't it cool!) and the DCWV paper was $19.99 for 48 sheets of 12 x 12 and as this album is only 8 x 8 I'll have "LOTS" of left over

LOVE - A baby is born with a need to be loved and never outgrows it

Image
Here's a really quick layout I did. The patterned paper was a gift and as it is all set up as a page I didn't have to do much... I added the photos of course and the flowers and the cute saying (rub-on).. The title though was a very cost saving exercise. I took some chipboard letters and traced around them onto the page. I then used my Marvy Uchida fabric puffy pen to colour them in and then hit them with the heat gun. The photo doesn't really show up how cool this is. The letters are slightly raised and have a velvety feel to them.

The 3 P's to a happy family Life

Image
Here's a layout I did of a day at the park. The 3 P's to a happy family life are of course Play, Park and Picnic! LOL! Anyway on this layout I used one piece of cardstock (from a block pad of course) and one piece of 6 x 6 patterned paper (from another mat stack pad). I then stamped the cardstock to repeat the circle theme of the patterned paper and cut out some elements from the paper and added them to the page with pop dots for extra interest. My title was created by inking a chipboard letter and cutting an "S" and a "3" from another 6 x 6 mat stack page (purple). All round this is a very cheap layout. Estimated Cost: 82 cents for the papers and then 10 cents for my chipboard letter. Add a little extra for the embossing and stamping... say 10cents then a few more cents for the scrap piece of paper I did my journalling on and the Dymo Labelling of the "P's" on the journalling..? Another 20 cents? So I'm looking at $1.12 cents for the wh

DD1 graduates

Image
I had to show you this great photo of DD1 at her daycare centre graduation ceremony. This year she starts "Prep" so her daycare centre had a little ceremony for all the children who are leaving them. I do love this photo but I am reminded of that seen in "The Incredibles" where Mr Incredible and Elastagirl are arguing over the graduation ceremony for their son. (EG: I can't believe you don't want to attend your own sons graduation ceremony. MI: It's psychotic. He's graduating from the 1st grade! etc....)

Here's my "original" nappy bag!

Image
Hi everyone, thought I'd show you what the finished product of my digitally scrapbooked nappy bag looks like. This is DH being silly and "modelling" it for me! LOL!

Using up your christmas cards and wrap

Christmas is over and by now you should be nearly free of all the "stuff" it bought with it! I like to take out the clear plastic windows out of the toy packaging to use in my scrapbooks and sometimes the background behind a toy can be a really pretty background for a page... Another way to use up your rubbish.. is to cut out the pictures off christmas cards and use these as embellishments. This cardstock may not be acid and lignin free so use another piece of cardstock behind it, some clear plastic or pop dots to keep it off your photos. If you're wanting to do something different you could take a piece of each kind of wrapping paper the gifts came in and create a background (use a quilting pattern as a guide) and then put your photos on clear plastic before adhering them to this surface (which I'm sure isn't acid and lignin free). Valentines Day is the next holiday on its way so think about keeping some of those cards and notes and using them on your layouts to

Free Paper Piecing Templates

Image
Hi Guys, I'm back..... well as back as a 4 week old baby will allow me to be.... LOL! Ella is doing well thanks to everyone who has sent me their well wishes and enquiries on her progress. She has gained a little over a pound in the last three weeks and is feeding well. Sleeping is another story... her daytime naps are all over the shop.. sometimes she will go to sleep well other times she will not sleep well till after her next feed (I Know its not because she's hungry because I am making so much milk for her she is drowning in it at times...) but I really don't mind as she's sleeping well of a night time and only waking me for feeds so you can't ask more than that. Anyway back to the important task of scrapbooking your memories of these precious moments... I completely agree with Anne that paper piecing is a cheap way to create your own unique embellishments. I know Anne makes alot of hers up herself but thought many of you might like a little more guidance so if

Bye to our guest blogger

Well it's time to say goodbye to our guest blogger Anne. I'm sure you'll all agree that Anne has done a great job and her layouts look fantastic! Anne has now set up her own blog where she posts her layouts (mostly following challenges) so if you'd like to see more of her layouts check her out at: http://scraptastic-stuff.blogspot.com/ A very big thank you from me! As I wouldn't of had any posts in ages if it weren't for your help!

Paper Piecing Examples

Image
Paper Piecing is one of my favourite things to do as not only are you makingan inexpensive LO as the only thing you are using is paper, but you are also ending up with something which is unique. In both of these LO's I have found pictures on the internet, one of a cute chair and the other of banana's. I have then found a selection of appropriate paper, and sometimes I have used patterned paper and with the banana's I have also used some of my glitter stack. I then cut out various sections of the picture (slowly decreasing in size) and then stuck them together. The bear on the chair is from the 'wall décor' set I found at the dollars and sense store. I just love the effect you get with paper piecing, it is time consuming, but often well worth the effort. Thanks for looking Regards, Anne P.S. Try and pick your favourite. I think mines' the bear in a chair! And such a cute photo of DS#2. luv Kyra

When I grow up

Image
Here is a LO where I have used a couple of interesting finds and ideas. Ihave taken some plain card stock and found a design for the numbers on theinternet. The template I used is attached. I then spent a LONG time withmy craft knife and cut out each of the shapes, but made sure to keep all thepieces and then stuck a piece of PP behind the plain card stock. TheGiraffe is a Dollars and Sense store find which is meant to be a 'walldécor' but I thought it would look GREAT here. Again, I have used my LaserLabels to do the journaling. Thanks for looking. Anne

Digi Scrap a Nappy Bag

Image
Here are the two options I created for my nappy bag. I'm getting it printed at the photo lab on their large Messenger Bag. Hubby chose option 1 as his favourite.... So that's the one I'm going with. I thought I'd share this idea with you as it gives you a cheaper option on the nappy bag front. The messenger bag was $59.00 including printing whereas a nappy bag from a baby shop costs upwards of $80.00 so a $30.00 saving PLUS it's so ORIGINAL! Option 1 is a template by Rhonna Farrer which I have used before for a ballet layout for DD1. This time I just added some Rhonna Farrer glitter swirls and Option 2 is a range by Shabby Princess. When its done I may sew on some sequins or beads or even extra ribbon for added texture and interest....... depends how much time I have on my hands.... LOL!

Happy New Year to all!

Hi everyone, just a quick post to wish you all a very happy new year! We've had a wonderful Christmas with the early arrival of Ella Rose and a fantastic start to the new year.... Mind you I was in bed by 9:30pm... I was up for a midnight feed though, so heard the fireworks but didn't get to 'celebrate' as such this year due to the new baby. (we live two blocks from the beach and our local council puts on fireworks over the water and everyone crowds the foreshore for a big party). I'd love to hear any ideas you've had on how to use all the "stuff" that comes into your lives at Christmas in a unique and miserly fashion in your scrapbooks. email your ideas to : cheapscrapbookingideas@yahoo.com and I'll post them up for all to see!

Our First Family Photo - Christmas Day 2008

Image
Here's our first family photo. This was taken on Christmas Day by my sister-in-law (and guest blogger) Anne. Ella is 2 weeks old in this shot. I tried desperately to use this photo on my latest bank account card but couldn't fit us all in nicely. BTW: That's Anne's Christmas tree and house in the background.