Posts

Showing posts with the label stamping

Zzzz

Image
This is a favourite layout of mine. I'm not sure if it really shows up well in this photo but the photo on the left I have hand cut elements of it and created a 3D effect. I painted, stamped, inked and glittered the Z/s to get different effects. The background paper is just a plain piece of paper that I have stamped and inked the edge of the page using white ink. The Winnie the Pooh chipboard elements are by Sandylion and were purchased from a Discount  shop and only cost me $2. Sandylion Winnie The Pooh Chipboard Medley, 22 Per Package

Using up your scraps making cards

Image
This card was really fast and easy to do. I made it for the teacher my DD will be getting next year when she starts prep (preschool). It was his birthday this week also. So I wanted to surprise him. He's such a fantastic teacher (DS had him when he did preschool) and I fought so long and hard to get him. I know DD will do really well with him and I think she will find the transition to being a big sister easier with some familiarities and expectations fulfilled (she thought she was starting school at the beginning of last year 2007 in his class, so it's been a long wait for her). Anyway all I did was attach a piece of patterned paper from the DCWV glitter stack range (left overs from previous projects.... see Friends layout) and then cut a square of foil cardstock larger than my stamped image and attached these using pop dots.... Pop dots are perfect for cards. They allow you to use a very simple design (aka: quick) but make it look good with the main elements popping off the...

Using a friends' Stamps!

Image
As I mentioned Easter Weekend I went to my best scrapbuddy's house and did some scrapbooking. Whilst I was there I took the opportunity to use her stamp collection. I used a sheet of white paper to stamp all the images on and tried to think of things that may suit my photos and future projects. I love going through another scrappers stamp collection. Often I'll find a stamp that is perfect for one project so I can borrow it. I only tend to buy a stamp if it will be useful for lots of projects.

Jordan's Hi 5 Party

Image
As you can see I don't scrap in order of event. That's because I get excited by the latest batch of photos that arrive and can't wait to scrap those. Well because I've been a bit busy lately I haven't had a chance to send any photos off for developing and consequently had to go back over projects that have been waiting a while. These photos are of DS's 5th Birthday. (I know I'm slack! Afterall I've only recently shown you photos of last Novembers' 6th Birthday!). As usual we had a ball organising this party. It was a Hi 5 Party. So there were Hi5 napkins, cups plates etc etc.... Then we got a Hi5 DVD of then teaching you how to do the dances to their songs. We moved all the furniture off the outdoor entertaining area so this resembled a stage (old packing crates with fence pailings nailed onto them.... another miserly invention) then we put the TV and DVD player on a Table outside and played the DVD so the kids could dance along. To do these la...

Scrapbook a Candle!

Image
Here's a great gift idea I forgot to share with you at Christmas. I went to a Stamp-In-Up Party a few months ago and the demonstrator shared with us this nifty idea. Stamp an image on a piece of tissue paper. Then cut out the image. Don't go too close to the edges. Then get a piece of baking paper and wrap it around the image and around the candle and extend it past the object to give yourself something to hold onto. Hold the two ends of the paper in one hand. Then turn on your heat gun and lightly wave it over your stamped image. You want to do this in little spurts as you're trying to melt a little of the wax to hold the image in place but you don't want to distort the shape of your candle. When that's complete you can add extra details like I did here with the ribbon and a split pit to hold it. I made these three candles to go with a calendar, receipe book, notebook present I made for someone.

My Off The Page Project - Cubby House

Image
My Latest Off the Page Project is...... A Cubby House! Here is "Rose Cottage". Complete with carport for DS's little jeep... This cubby house took my father-in-law and DH a weekend to build. We were lucky enough to get our materials for free (only spent $80 on the roof, and some wood for the frame, hinges, door handle, letterbox, window box and one of the pailings in the verandah and the lino flooring.) as our neighbours were renovating their house. This shot is from the front showing the planter box and letterbox off to their best advantage. On the door I stencilled some roses in the corners of the door and then I stamped "welcome" on this little oval plate then I stuck down some blue roses. (for regular readers you'll notice they're the same type of rose as the ones I used on my DD's wardrobe) These roses were stencilled on the outside of the cottage. This letterbox was added as my kids love to get the mail out of the letterbox and pretend t...

Make your own patterned paper

Image
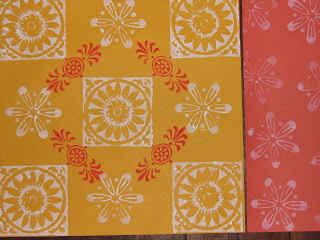
One of the things I love to do with my layouts is to have elements that match perfectly. I don't like having one element not match in well with the rest of the layout. This creates a focus on the page that isn't my photo. At the end of the day my layouts are done to compliment my photos but the photo is still the main focus. So when a paper or embellishment isn't in the right colour shade or the pattern doesn't match... it will stand out like you know what to me! Also I hate it when I know what paper I want and I can't have it cause it doesn't exist. So in these cases I'l paint the pattern myself. In theabove examples I've used some foam stamps from Making Memories to create two papers that will co-ordinate with my layouts. I also use only scrapbooking paints such as Making Memories brand when I do this as I know they are acid and lignin free. I think this is a very cheap way to get a unique look to your layouts. I buy the plain coloured paper in ...

Another Cheap Layout - Mr Sandman $1.20

Image
Mr Sandman... bring me a dream..... This is a very cheap layout at $1.20 I used four different papers to complete this layout. Three of those were left overs from previous layouts. I inked the edges and stamped the background. The word "Dream" was created using a free supply from a magazine and the rest of the words "bring me a " were punched out of paper as was the "4". So the breakdown cost of the layout is: Patterned Background Paper $0.50, Plain Black Paper $0.20 Plain yellow paper $0.20 and Patterned Red paper $0.30 Has anyone got a cheaper layout we can feature? Email me at: cheapscrapbookingideas@yahoo.com

Layout: What do you do?

Image
This is the layout I completed last night. I love these photos taken on our holiday to the sunshine coast in september 2006. My son picked an ice-cream flavour called strawberry shortcake... but then as sometimes happens.... he didn't like it... so his solution was simple... share with his sister. Luckily she didn't mind! I thought I'd try a technique for hidden journalling that allows you to open the journalling box despite the rest of the layout being inside your page protector. Here I've used the smallest photo as the 'book cover' for my journalling. This section is raised off the layout via magnets that allow this photo to be on the outside of the page protector. This is a really cheap layout with the magnet costing $2 for a set of 6 (pairs), my chipboard letters (share) and arrow are off the back of old notebooks and the "bling" comes in a packet of 50 pieces for $2 and the larger blue bling flower is off my daughters/ hairclip... so all tha...

Stamps, Stamps lots of Stamps

I was very naughty this weekend. I was at my local K-Mart and they had a box of stamps in a kit ..... well the price wasn't that reasonable at $59.00 but with over 150 stamps in the kit plus two alphabet sets including numerical..... how could I resist? There are so many sets in this lot: Flowers, love, wedding, baby, girl, boy, birthday, heritage, animals! And best of all they're clear mounted so they're more economical on storage space and it's really easy to see where you're placing your stamp. I know $59.00 is not very miserly of me. But sometimes you have to spend a larger amount of money for the overall saving. I know that purchasing 150 stamps even at $1 each (cheapest price I've found for a single stamp) would still cost me $150 then there's the alphabet sets to consider... Usually $4.95 each? So all things considered it was a very miserly purchase. I think stamps are one of the best purchases you can make as they allow you to create matching pape...

Can't afford a heat gun?

O.K. I've been doing more stamping . Especially seeing as how wonderful scrubbie (scrap hubby.... see the first funny video I posted below for more information on this topic... lol), Anyway my wonderful scrubbie got me a set of inks and stamps for Christmas. So I've been stamping away since christmas and have now started using embossing powder ... but.... you really need a heat gun to make embossing powder work. I tried using my hairdryer and all it did was blow the embossing powder right off... Then I tried using the toaster , but that didn't work at all.... So getting a little desperate by now as it was late at night and none of the stores were open to sell me a heat gun... I stumbled upon the perfect way to heat my embossing powder.... You'll never guess.... My hair straightener ! Yep that's right my hair straightener. Now my hair straightener came from one of the discount chains and cost me $25.00, it has ceramic plates and a heat dial (a great buy in its o...