Boys Birthday Card
Well it's been pretty hectic around here craft wise lately. My teaching post at Arnolds Scrapbooking Store has me creating things and preparing for classes. I'm really enjoying it. I have had some fantastic students who are pushing me in new creative directions which I love! There is also a new creative outlet for me which I'll tell you more about when it's close to the time..... surfice to say I'm as happy as a pig in mud! And then of course there's my never ending wall of canvas (will get you a photo of this soon I promise! LOL) and all the presents I make for people.... So very busy, hence the lack of posting here.....
Anyway this weekend my son attended the birthday party of a friend of his and I made this card for the party.
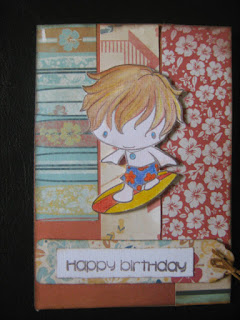


I used leftover papers from a 6 x 6 paper pad I had called (Kaisercraft) Seaside Collection. I then stamped the image and coloured it using watercolour pencils.
I haven't worked with watercolour pencils in such a long time. I used to paint with them alot BS (Before Scrapbooking) and have only just rediscovered them. Now that my scrapspace is all organised I have everything within easy reach which means I am using alot of tools I haven't seen for ages... lol
Watercolour pencils are a great and inexpensive way to colour your stamped images. You can get a packet from the discount variety stores for under $10 (I wish that option had been available when I got mine). All you do is lightly colour your image (you can colour a little bit heavier where you'd like the shading), then using a paint brush dipped in water (wipe off the excess) lightly go over the coloured part of the image and you'll see the change immediately. It goes from looking like a pencil colouring in to looking like a watercolour painting (just with better control over the light and shade and blending of colours). Unfortunately I was in a hurry so his hair doesn't have the right effect. Ideally you should colour the hair region in one colour lightly. Then come back and add the shade by adding a little more colouring to those areas. Use your brush and water to blend and then allow to dry completely. When dry come back with different colour pencils. One darker and one lighter and your original colour and use your pencil to add individual hairs.
I have a video coming where I demonstrate the simple basic steps of waterpencil colouring. If anyone is interested in more detail let me know and I'll do another video. I also have a video coming on basic stamping techniques. I love stamping as a way of adding interest to elements and backgrounds. It's also great for making card toppers and titles for your scrapbooking. I especially love how you can buy a stamp and use it over and over and over again whereas a sticker or rub-on is a once only deal. You can stamp on paper, cardstock, chipboard, canvas, foam, plastic, fabric and acetate to get different effects. Different kinds of ink will also change the effect you get and then when you add embossing powder to the mix, well the effects are endless. At the moment I'm a bit obsessed with glimmermisting and am loving the effect I get when I stamp with a clear ink and clear embossing powder and then spritz glimmermist over the top.
Anyway this weekend my son attended the birthday party of a friend of his and I made this card for the party.

front of the card.

inside of the card with room for a gift card.

close up of the stamped coloured image. Sorry it's a little blurry. I was in a hurry as we were literally heading straight out the door so I didn't check that the shot was good before I raced off.
I used leftover papers from a 6 x 6 paper pad I had called (Kaisercraft) Seaside Collection. I then stamped the image and coloured it using watercolour pencils.
I haven't worked with watercolour pencils in such a long time. I used to paint with them alot BS (Before Scrapbooking) and have only just rediscovered them. Now that my scrapspace is all organised I have everything within easy reach which means I am using alot of tools I haven't seen for ages... lol
Watercolour pencils are a great and inexpensive way to colour your stamped images. You can get a packet from the discount variety stores for under $10 (I wish that option had been available when I got mine). All you do is lightly colour your image (you can colour a little bit heavier where you'd like the shading), then using a paint brush dipped in water (wipe off the excess) lightly go over the coloured part of the image and you'll see the change immediately. It goes from looking like a pencil colouring in to looking like a watercolour painting (just with better control over the light and shade and blending of colours). Unfortunately I was in a hurry so his hair doesn't have the right effect. Ideally you should colour the hair region in one colour lightly. Then come back and add the shade by adding a little more colouring to those areas. Use your brush and water to blend and then allow to dry completely. When dry come back with different colour pencils. One darker and one lighter and your original colour and use your pencil to add individual hairs.
I have a video coming where I demonstrate the simple basic steps of waterpencil colouring. If anyone is interested in more detail let me know and I'll do another video. I also have a video coming on basic stamping techniques. I love stamping as a way of adding interest to elements and backgrounds. It's also great for making card toppers and titles for your scrapbooking. I especially love how you can buy a stamp and use it over and over and over again whereas a sticker or rub-on is a once only deal. You can stamp on paper, cardstock, chipboard, canvas, foam, plastic, fabric and acetate to get different effects. Different kinds of ink will also change the effect you get and then when you add embossing powder to the mix, well the effects are endless. At the moment I'm a bit obsessed with glimmermisting and am loving the effect I get when I stamp with a clear ink and clear embossing powder and then spritz glimmermist over the top.


Comments